
Adapting CLIP to YouTube Data (with Python Code)
This is the 4th article in a larger series on multimodal AI. In the previous post, we discussed multimodal RAG systems, which can retrieve and synthesize information from different data modalities (e.g. text, images, audio). There, we saw how we could implement such a system using CLIP. One issue with this approach, however, is that vector search results from a general-purpose embedding model (like CLIP) may perform poorly in domain-specific use cases. In this article, I’ll discuss how we can mitigate these issues via fine-tuning multimodal embedding models.

https://medium.com/media/51e4418b1f33079dd5bd6cfce1e2b8e1/href
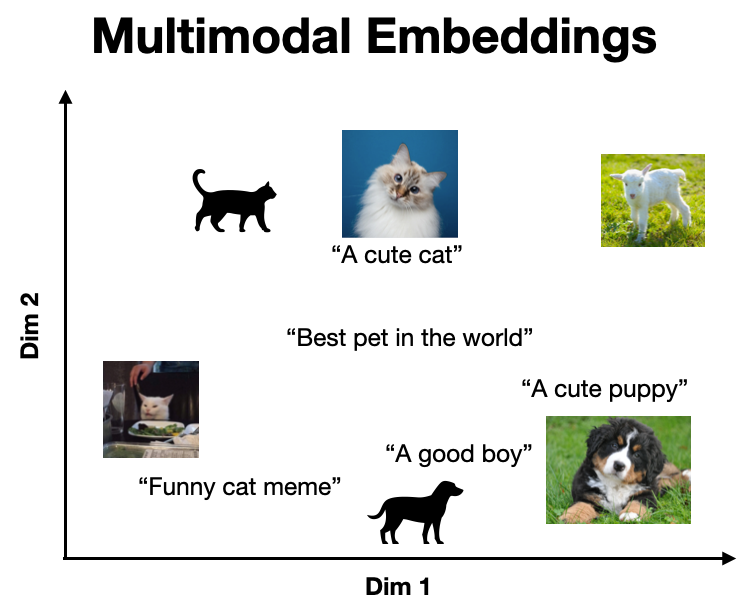
Multimodal embeddings represent multiple data modalities in the same vector space such that similar concepts are co-located. A visual example of this is shown below, where semantically similar items (e.g. a picture of a dog and its corresponding caption) are close, while dissimilar items (e.g. a picture of a cat and a caption describing a dog) are far apart.
A popular multimodal embedding model is CLIP, which was trained on a massive corpus of image-caption pairs using contrastive learning. The key insight from CLIP was that such a model unlocks 0-shot abilities such as image classification, search, and captioning [1].
One limitation here is that CLIP’s 0-shot abilities may not transfer well to domains involving specialized information e.g. architectural drawings, medical imaging, and technical jargon. In such cases, we can improve CLIP’s performance through fine-tuning.
Fine-tuning CLIP
Fine-tuning involves adapting a model to a particular use case through additional training. This is powerful because it enables us to build on top of existing state-of-the-art models to develop powerful specialized models with relatively small data.
We can do this with CLIP through the following key steps.
- Collect text-image training pairs
- Pre-process training data
- Define Evals
- Fine-tune the model
- Evaluate the model
I will discuss each of these steps in the context of a concrete example. If you are curious about what this looks like for text embedding (i.e. text-text pairs), I did that in a previous blog post.
Fine-Tuning Text Embeddings For Domain-Specific Search
Example: Fine-tuning CLIP on YouTube Titles and Thumbnails
Here, I will fine-tune CLIP on titles and thumbnails from my YouTube channel. At the end of this, we will have a model that can take title-thumbnail pairs and return a similarity score. This can be used for practical applications such as matching title ideas to an existing thumbnail or performing search over a thumbnail library.
The example code, dataset, and fine-tuned model are freely available on GitHub and the Hugging Face Hub, respectively. You can use this code and data to train your own models. If you end up publishing any work using this dataset, please cite the original source 🙂
GitHub Repo | Dataset | Fine-tuned Model
Step 1: Collect Text-Image Training Pairs
The first (and most important) step of any fine-tuning process is data collection. Here, I extracted title-thumbnail pairs from my channel in a 2-step process.
First, I used YouTube’s search API to extract the video IDs for all the videos on my channel. Second, I used YouTube’s video API to extract the title and thumbnail URL of each of my long-form videos (i.e. longer than 3 min).
# imports
from top_secret import my_key
import requests
from isodate import parse_duration

import pandas as pd
import numpy as np
from sentence_transformers import SentenceTransformer
from datasets import DatasetDict, Dataset
channel_id = 'UCa9gErQ9AE5jT2DZLjXBIdA' # my YouTube channel ID
page_token = None # initialize page token
url = 'https://www.googleapis.com/youtube/v3/search' # YouTube search API

# extract video data across multiple search result pages
video_id_list = []

while page_token != 0:
    params = {
        "key": my_key,
        'channelId': channel_id,
        'part': ["snippet","id"],
        'order': "date",
        'maxResults':50,
        'pageToken': page_token
    }
    response = requests.get(url, params=params)

    for raw_item in dict(response.json())['items']:

        # only execute for youtube videos
        if raw_item['id']['kind'] != "youtube#video":
            continue

        # grab video ids
        video_id_list.append(raw_item['id']['videoId'])

    try:
        # grab next page token
        page_token = dict(response.json())['nextPageToken']
    except:
        # if no next page token kill while loop
        page_token = 0
Note that you will need a YouTube API key to run the above Python code, which you can create using the Google Cloud Console. To adapt this to your channel, you just need to change the channel_id variable.
# extract video titles and thumbnails
url = "https://www.googleapis.com/youtube/v3/videos"
video_data_list = []

for video_id in video_id_list:

    params = {
        "part": ["snippet","contentDetails"],
        "id": video_id,
        "key": my_key,
    }
    response = requests.get(url, params=params)

    raw_dict = dict(response.json())['items'][0]

    # only process videos longer than 3 minutes
    iso_duration = raw_dict['contentDetails']["duration"]
    if parse_duration(iso_duration).total_seconds() < 180:
        continue

    # extract video data
    video_data = {}
    video_data['video_id'] = video_id
    video_data['title'] = raw_dict['snippet']['title']
    video_data['thumbnail_url'] = raw_dict['snippet']['thumbnails']['high']['url']

    # append data to list
    video_data_list.append(video_data)
As an additional step, I created negative thumbnail-title pairs. We can use these during the training process to not only guide the model with examples of which embedding should be close together (i.e. positive pair), but also which embedding should be far apart (i.e. negative pairs).
To do this, I computed the similarity between all possible title pairs using the sentence transformer library. Then for each positive pair, I matched the least similar title as a negative example (ensuring there were no duplicates).
# store data in dataframe
df = pd.DataFrame(video_data_list)

# Load the model
model = SentenceTransformer("all-mpnet-base-v2")

# Encode all titles
embeddings = model.encode(df['title'].to_list())

# compute similarities
similarities = model.similarity(embeddings, embeddings)

# match least JDs least similar to positive match as the negative match
similarities_argsorted = np.argsort(similarities.numpy(), axis=1)
negative_pair_index_list = []

for i in range(len(similarities)):

    # Start with the smallest similarity index for the current row
    j = 0
    index = int(similarities_argsorted[i][j])

    # Ensure the index is unique
    while index in negative_pair_index_list:
        j += 1  # Move to the next smallest index
        index = int(similarities_argsorted[i][j])  # Fetch next smallest index

    negative_pair_index_list.append(index)

# add negative pairs to df
df['title_neg'] = df['title'].iloc[negative_pair_index_list].values
Finally, I created a train-valid-test split and pushed the dataset to the Hugging Face Hub.
# Shuffle the dataset
df = df.sample(frac=1, random_state=42).reset_index(drop=True)

# Split into train, validation, and test sets
train_frac = 0.7
valid_frac = 0.15
test_frac = 0.15

# define train and validation size
train_size = int(train_frac * len(df))
valid_size = int(valid_frac * len(df))

# create train, validation, and test datasets
df_train = df[:train_size]
df_valid = df[train_size:train_size + valid_size]
df_test = df[train_size + valid_size:]

# Convert the pandas DataFrames back to Hugging Face Datasets
train_ds = Dataset.from_pandas(df_train)
valid_ds = Dataset.from_pandas(df_valid)
test_ds = Dataset.from_pandas(df_test)

# Combine into a DatasetDict
dataset_dict = DatasetDict({
    'train': train_ds,
    'valid': valid_ds,
    'test': test_ds
})
# push data to hub
dataset_dict.push_to_hub("shawhin/yt-title-thumbnail-pairs")
Step 2: Pre-process Training Pairs
Although we have all the data we need for fine-tuning, it is still not a suitable format for training. More specifically, we need to convert our image URLs to PIL image objects and organize our data into (anchor, positive, negative) triplets, i.e., a thumbnail, its corresponding title, and negative title, respectively.
We can process all three data splits (i.e. train, valid, and test) in the following way using the Hugging Face Datasets library.
from PIL import Image

# load dataset
dataset = load_dataset("shawhin/yt-title-thumbnail-pairs")

# define preprocessing function
def preprocess(batch):
    """
        Preprocessing data without augmentations for test set
    """
    # get images from urls
    image_list = [Image.open(requests.get(url, stream=True).raw)
                      for url in batch["thumbnail_url"]]

    # return columns with standard names
    return {
        "anchor": image_list,
        "positive": batch["title"],
        "negative": batch["title_neg"]
    }

# remove columns not relevant to training
columns_to_remove = [col for col in dataset['train'].column_names
                        if col not in ['anchor', 'positive', 'negative']]
# apply transformations
dataset = dataset.map(preprocess, batched=True,
                         remove_columns=columns_to_remove)
It’s important that we order our columns as (anchor, positive, negative) triplets because this is the format expected by the loss function we will use during training (which I learned the hard way).
Step 3: Define Evals
Training involves optimizing a model’s parameters to minimize a loss function. However, this value (i.e. a contrastive loss) is rarely helpful in assessing the model’s performance on a downstream task (e.g. matching titles to thumbnails).
A quantity that is more insightful, in this case, is the model’s ability to correctly match a given thumbnail to the correct title among several candidates. This is denoted Recall@1.
We can implement an evaluator compatible with the Sentence Transformers library to compute this metric. Since the code is quite long, I won’t paste it here, but the curious reader can find it in Cell 12 of this notebook.
# function to create new evaluator given data split
def create_recall_evaluator(set_name, k=1):
    """
        Create triplet evaluator for "train", "valid", or "test" split
    """

    return ImageTextRetrievalEvaluator(
        images=dataset[f"{set_name}"]["anchor"],
        texts=dataset[f"{set_name}"]["positive"],
        name=f"yt-title-thumbnail-{set_name}",
        k=k
    )

# Create new evaluator with Recall@k
evaluator_recall_train = create_recall_evaluator("train", k=1)
evaluator_recall_valid = create_recall_evaluator("valid", k=1)

print("Train:", evaluator_recall_train(model))
print("Valid:", evaluator_recall_valid(model))

# >> Train: {'yt-title-thumbnail-train_Recall@1': 0.660377358490566}
# >> Valid: {'yt-title-thumbnail-valid_Recall@1': 0.6363636363636364}
We can see the model already has decent performance out-of-the-box, with correct titles being matched 66% of the time.
Step 4: Fine-tune the Model
There are 3 key things we must do before training the model. Namely, choose which parameters to train, pick a loss function, and set hyperparameters.
Trainable Parameters
The key limitation of this project is that I’ve only posted 76 YouTube videos (as of writing this). With the validation and test splits, this leaves only 53 examples for training.
Since we have so few training examples, limiting the number of parameters we train is a good idea. In this case, I only train the final projection layer of the model, which maps the text and image embeddings into a shared vector space. This is about 1M parameters total.
# import model
from sentence_transformers import SentenceTransformer
model = SentenceTransformer("sentence-transformers/clip-ViT-L-14")

# pick specific layers to train (note: you can add more layers to this list)
trainable_layers_list = ['projection']

# Apply freezing configuration
for name, param in model.named_parameters():

    # freeze all params
    param.requires_grad = False

    # unfreeze layers in trainable_layers_list
    if any(layer in name for layer in trainable_layers_list):
        param.requires_grad = True
# Count total and trainable parameters
total_params = sum(p.numel() for p in model.parameters())
trainable_params = sum(p.numel() for p in model.parameters() if p.requires_grad)

print(f"Total parameters: {total_params:,}")
print(f"Trainable parameters: {trainable_params:,}")
print(f"% of trainable parameters: {100*trainable_params/total_params:.2f}%")

# >> Total parameters: 427,616,513
# >> Trainable parameters: 1,376,256
# >> % of trainable parameters: 0.32%
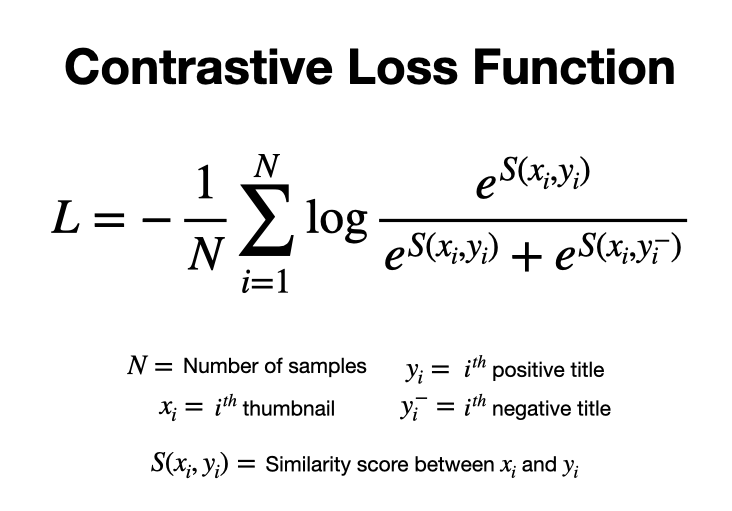
Loss function
Here, I use the Multiple Negatives Ranking Loss from the Sentence Transformers library (which works with single negatives like in this case). It works by maximizing the similarity between positive pairs while minimizing the similarity between negative pairs. Here’s what the loss function looks like for the single negative case [2].
from sentence_transformers.losses import MultipleNegativesRankingLoss

# define loss
loss = MultipleNegativesRankingLoss(model)
Hyperparameters
For hyperparameters, I experimented with a handful of choices manually and picked the choice with the best validation loss and Recall@1 performance. Here are the final choices.
from sentence_transformers import SentenceTransformerTrainingArguments

# hyperparameters
num_epochs = 2
batch_size = 16
lr = 1e-4
finetuned_model_name = "clip-title-thumbnail-embeddings"

train_args = SentenceTransformerTrainingArguments(
    output_dir=f"models/{finetuned_model_name}",
    num_train_epochs=num_epochs,
    per_device_train_batch_size=batch_size,
    per_device_eval_batch_size=batch_size,
    learning_rate=lr,
    # Evaluation settings
    eval_strategy="epoch",
    eval_steps=1,
    logging_steps=1,
)
With our loss and hyperparameters defined, we can train the model using the SentenceTransformersTrainer().
from sentence_transformers import SentenceTransformerTrainer

trainer = SentenceTransformerTrainer(
    model=model,
    args=train_args,
    train_dataset=dataset["train"],
    eval_dataset=dataset["valid"],
    loss=loss,
    evaluator=[evaluator_recall_train, evaluator_recall_valid],
)
trainer.train()
Model training is an iterative process where you may explore dozens of models for different choices of trainable parameters, loss functions, and hyperparameters.
However, I highly recommend keeping these experiments as simple as possible. If you find yourself spending too much time tweaking training args to get your model to converge, there’s probably something fundamentally wrong with your data (speaking from experience 😅).
Step 5: Evaluate the Model
As a final step, we can evaluate the model’s Recall@1 score on the testing set. These data were not used for training or hyperparameter tuning, so it gives us an unbiased assessment of the model.
evaluator_recall_test = create_recall_evaluator("test")

print("Train:", evaluator_recall_train(model))
print("Valid:", evaluator_recall_valid(model))
print("Test:", evaluator_recall_test(model))

# >> Train: {'yt-title-thumbnail-train_Recall@1': 0.8490566037735849}
# >> Valid: {'yt-title-thumbnail-valid_Recall@1': 0.9090909090909091}
# >> Test: {'yt-title-thumbnail-test_Recall@1': 0.75}
We see that the model performs well across all three datasets with 75% Recall@1 on the test set. In other words, 75% of the time, the model correctly matches a given thumbnail to its original title. Additionally, the recall for the validation dataset increases by 27%!
What’s Next?
Multimodal embedding models, like CLIP, unlock countless 0-shot use cases such as image classification and retrieval. Here, we saw how we can fine-tune such a model to adapt it to a specialized domain (i.e. my YouTube titles and thumbnails).
Although CLIP is a small model by today’s standards (~500M parameters) and our training dataset was tiny, the final model still demonstrated strong performance on this task. This highlights the power of fine-tuning.
If you have any questions or suggestions for future content, let me know in the comments 🙂
More on Multimodal AI 👇
🗞️ Get exclusive access to AI resources and project ideas: https://the-data-entrepreneurs.kit.com/shaw
🧑🎓 Learn AI in 6 weeks by building it: https://maven.com/shaw-talebi/ai-builders-bootcamp?promoCode=AI25
References
[1] arXiv:2103.00020 [cs.CV]
[2] arXiv:1705.00652 [cs.CL]
Fine-tuning Multimodal Embedding Models was originally published in Towards Data Science on Medium, where people are continuing the conversation by highlighting and responding to this story.
Adapting CLIP to YouTube Data (with Python Code)This is the 4th article in a larger series on multimodal AI. In the previous post, we discussed multimodal RAG systems, which can retrieve and synthesize information from different data modalities (e.g. text, images, audio). There, we saw how we could implement such a system using CLIP. One issue with this approach, however, is that vector search results from a general-purpose embedding model (like CLIP) may perform poorly in domain-specific use cases. In this article, I’ll discuss how we can mitigate these issues via fine-tuning multimodal embedding models.Photo by Markus Winkler on Unsplashhttps://medium.com/media/51e4418b1f33079dd5bd6cfce1e2b8e1/hrefMultimodal embeddings represent multiple data modalities in the same vector space such that similar concepts are co-located. A visual example of this is shown below, where semantically similar items (e.g. a picture of a dog and its corresponding caption) are close, while dissimilar items (e.g. a picture of a cat and a caption describing a dog) are far apart.Stock photos from Canva. Image by author.A popular multimodal embedding model is CLIP, which was trained on a massive corpus of image-caption pairs using contrastive learning. The key insight from CLIP was that such a model unlocks 0-shot abilities such as image classification, search, and captioning [1].One limitation here is that CLIP’s 0-shot abilities may not transfer well to domains involving specialized information e.g. architectural drawings, medical imaging, and technical jargon. In such cases, we can improve CLIP’s performance through fine-tuning.Fine-tuning CLIPFine-tuning involves adapting a model to a particular use case through additional training. This is powerful because it enables us to build on top of existing state-of-the-art models to develop powerful specialized models with relatively small data.We can do this with CLIP through the following key steps.Collect text-image training pairsPre-process training dataDefine EvalsFine-tune the modelEvaluate the modelI will discuss each of these steps in the context of a concrete example. If you are curious about what this looks like for text embedding (i.e. text-text pairs), I did that in a previous blog post.Fine-Tuning Text Embeddings For Domain-Specific SearchExample: Fine-tuning CLIP on YouTube Titles and ThumbnailsHere, I will fine-tune CLIP on titles and thumbnails from my YouTube channel. At the end of this, we will have a model that can take title-thumbnail pairs and return a similarity score. This can be used for practical applications such as matching title ideas to an existing thumbnail or performing search over a thumbnail library.The example code, dataset, and fine-tuned model are freely available on GitHub and the Hugging Face Hub, respectively. You can use this code and data to train your own models. If you end up publishing any work using this dataset, please cite the original source :)GitHub Repo | Dataset | Fine-tuned ModelStep 1: Collect Text-Image Training PairsThe first (and most important) step of any fine-tuning process is data collection. Here, I extracted title-thumbnail pairs from my channel in a 2-step process.First, I used YouTube’s search API to extract the video IDs for all the videos on my channel. Second, I used YouTube’s video API to extract the title and thumbnail URL of each of my long-form videos (i.e. longer than 3 min).# importsfrom top_secret import my_keyimport requestsfrom isodate import parse_durationimport pandas as pdimport numpy as npfrom sentence_transformers import SentenceTransformerfrom datasets import DatasetDict, Datasetchannel_id = ‘UCa9gErQ9AE5jT2DZLjXBIdA’ # my YouTube channel IDpage_token = None # initialize page tokenurl = ‘https://www.googleapis.com/youtube/v3/search’ # YouTube search API # extract video data across multiple search result pagesvideo_id_list = []while page_token != 0: params = { “key”: my_key, ‘channelId’: channel_id, ‘part’: [“snippet”,”id”], ‘order’: “date”, ‘maxResults’:50, ‘pageToken’: page_token } response = requests.get(url, params=params) for raw_item in dict(response.json())[‘items’]: # only execute for youtube videos if raw_item[‘id’][‘kind’] != “youtube#video”: continue # grab video ids video_id_list.append(raw_item[‘id’][‘videoId’]) try: # grab next page token page_token = dict(response.json())[‘nextPageToken’] except: # if no next page token kill while loop page_token = 0Note that you will need a YouTube API key to run the above Python code, which you can create using the Google Cloud Console. To adapt this to your channel, you just need to change the channel_id variable.# extract video titles and thumbnailsurl = “https://www.googleapis.com/youtube/v3/videos”video_data_list = []for video_id in video_id_list: params = { “part”: [“snippet”,”contentDetails”], “id”: video_id, “key”: my_key, } response = requests.get(url, params=params) raw_dict = dict(response.json())[‘items’][0] # only process videos longer than 3 minutes iso_duration = raw_dict[‘contentDetails’][“duration”] if parse_duration(iso_duration).total_seconds() < 180: continue # extract video data video_data = {} video_data[‘video_id’] = video_id video_data[‘title’] = raw_dict[‘snippet’][‘title’] video_data[‘thumbnail_url’] = raw_dict[‘snippet’][‘thumbnails’][‘high’][‘url’] # append data to list video_data_list.append(video_data)As an additional step, I created negative thumbnail-title pairs. We can use these during the training process to not only guide the model with examples of which embedding should be close together (i.e. positive pair), but also which embedding should be far apart (i.e. negative pairs).To do this, I computed the similarity between all possible title pairs using the sentence transformer library. Then for each positive pair, I matched the least similar title as a negative example (ensuring there were no duplicates).# store data in dataframedf = pd.DataFrame(video_data_list)# Load the modelmodel = SentenceTransformer(“all-mpnet-base-v2”)# Encode all titlesembeddings = model.encode(df[‘title’].to_list())# compute similaritiessimilarities = model.similarity(embeddings, embeddings)# match least JDs least similar to positive match as the negative matchsimilarities_argsorted = np.argsort(similarities.numpy(), axis=1)negative_pair_index_list = []for i in range(len(similarities)): # Start with the smallest similarity index for the current row j = 0 index = int(similarities_argsorted[i][j]) # Ensure the index is unique while index in negative_pair_index_list: j += 1 # Move to the next smallest index index = int(similarities_argsorted[i][j]) # Fetch next smallest index negative_pair_index_list.append(index)# add negative pairs to dfdf[‘title_neg’] = df[‘title’].iloc[negative_pair_index_list].valuesFinally, I created a train-valid-test split and pushed the dataset to the Hugging Face Hub.# Shuffle the datasetdf = df.sample(frac=1, random_state=42).reset_index(drop=True)# Split into train, validation, and test setstrain_frac = 0.7valid_frac = 0.15test_frac = 0.15# define train and validation sizetrain_size = int(train_frac * len(df))valid_size = int(valid_frac * len(df))# create train, validation, and test datasetsdf_train = df[:train_size]df_valid = df[train_size:train_size + valid_size]df_test = df[train_size + valid_size:]# Convert the pandas DataFrames back to Hugging Face Datasetstrain_ds = Dataset.from_pandas(df_train)valid_ds = Dataset.from_pandas(df_valid)test_ds = Dataset.from_pandas(df_test)# Combine into a DatasetDictdataset_dict = DatasetDict({ ‘train’: train_ds, ‘valid’: valid_ds, ‘test’: test_ds})# push data to hubdataset_dict.push_to_hub(“shawhin/yt-title-thumbnail-pairs”)Step 2: Pre-process Training PairsAlthough we have all the data we need for fine-tuning, it is still not a suitable format for training. More specifically, we need to convert our image URLs to PIL image objects and organize our data into (anchor, positive, negative) triplets, i.e., a thumbnail, its corresponding title, and negative title, respectively.We can process all three data splits (i.e. train, valid, and test) in the following way using the Hugging Face Datasets library.from PIL import Image# load datasetdataset = load_dataset(“shawhin/yt-title-thumbnail-pairs”)# define preprocessing functiondef preprocess(batch): “”” Preprocessing data without augmentations for test set “”” # get images from urls image_list = [Image.open(requests.get(url, stream=True).raw) for url in batch[“thumbnail_url”]] # return columns with standard names return { “anchor”: image_list, “positive”: batch[“title”], “negative”: batch[“title_neg”] }# remove columns not relevant to trainingcolumns_to_remove = [col for col in dataset[‘train’].column_names if col not in [‘anchor’, ‘positive’, ‘negative’]]# apply transformationsdataset = dataset.map(preprocess, batched=True, remove_columns=columns_to_remove)It’s important that we order our columns as (anchor, positive, negative) triplets because this is the format expected by the loss function we will use during training (which I learned the hard way).Step 3: Define EvalsTraining involves optimizing a model’s parameters to minimize a loss function. However, this value (i.e. a contrastive loss) is rarely helpful in assessing the model’s performance on a downstream task (e.g. matching titles to thumbnails).A quantity that is more insightful, in this case, is the model’s ability to correctly match a given thumbnail to the correct title among several candidates. This is denoted [email protected] can implement an evaluator compatible with the Sentence Transformers library to compute this metric. Since the code is quite long, I won’t paste it here, but the curious reader can find it in Cell 12 of this notebook.# function to create new evaluator given data splitdef create_recall_evaluator(set_name, k=1): “”” Create triplet evaluator for “train”, “valid”, or “test” split “”” return ImageTextRetrievalEvaluator( images=dataset[f”{set_name}”][“anchor”], texts=dataset[f”{set_name}”][“positive”], name=f”yt-title-thumbnail-{set_name}”, k=k )# Create new evaluator with Recall@kevaluator_recall_train = create_recall_evaluator(“train”, k=1)evaluator_recall_valid = create_recall_evaluator(“valid”, k=1)print(“Train:”, evaluator_recall_train(model))print(“Valid:”, evaluator_recall_valid(model))# >> Train: {‘yt-title-thumbnail-train_Recall@1’: 0.660377358490566}# >> Valid: {‘yt-title-thumbnail-valid_Recall@1’: 0.6363636363636364}We can see the model already has decent performance out-of-the-box, with correct titles being matched 66% of the time.Step 4: Fine-tune the ModelThere are 3 key things we must do before training the model. Namely, choose which parameters to train, pick a loss function, and set hyperparameters.Trainable ParametersThe key limitation of this project is that I’ve only posted 76 YouTube videos (as of writing this). With the validation and test splits, this leaves only 53 examples for training.Since we have so few training examples, limiting the number of parameters we train is a good idea. In this case, I only train the final projection layer of the model, which maps the text and image embeddings into a shared vector space. This is about 1M parameters total.# import modelfrom sentence_transformers import SentenceTransformermodel = SentenceTransformer(“sentence-transformers/clip-ViT-L-14″)# pick specific layers to train (note: you can add more layers to this list)trainable_layers_list = [‘projection’]# Apply freezing configurationfor name, param in model.named_parameters(): # freeze all params param.requires_grad = False # unfreeze layers in trainable_layers_list if any(layer in name for layer in trainable_layers_list): param.requires_grad = True# Count total and trainable parameterstotal_params = sum(p.numel() for p in model.parameters())trainable_params = sum(p.numel() for p in model.parameters() if p.requires_grad)print(f”Total parameters: {total_params:,}”)print(f”Trainable parameters: {trainable_params:,}”)print(f”% of trainable parameters: {100*trainable_params/total_params:.2f}%”)# >> Total parameters: 427,616,513# >> Trainable parameters: 1,376,256# >> % of trainable parameters: 0.32%Loss functionHere, I use the Multiple Negatives Ranking Loss from the Sentence Transformers library (which works with single negatives like in this case). It works by maximizing the similarity between positive pairs while minimizing the similarity between negative pairs. Here’s what the loss function looks like for the single negative case [2].Mulitple negatives loss function (with only 1 negative). Image by author.from sentence_transformers.losses import MultipleNegativesRankingLoss# define lossloss = MultipleNegativesRankingLoss(model)HyperparametersFor hyperparameters, I experimented with a handful of choices manually and picked the choice with the best validation loss and Recall@1 performance. Here are the final choices.from sentence_transformers import SentenceTransformerTrainingArguments# hyperparametersnum_epochs = 2batch_size = 16lr = 1e-4finetuned_model_name = “clip-title-thumbnail-embeddings”train_args = SentenceTransformerTrainingArguments( output_dir=f”models/{finetuned_model_name}”, num_train_epochs=num_epochs, per_device_train_batch_size=batch_size, per_device_eval_batch_size=batch_size, learning_rate=lr, # Evaluation settings eval_strategy=”epoch”, eval_steps=1, logging_steps=1,)With our loss and hyperparameters defined, we can train the model using the SentenceTransformersTrainer().from sentence_transformers import SentenceTransformerTrainertrainer = SentenceTransformerTrainer( model=model, args=train_args, train_dataset=dataset[“train”], eval_dataset=dataset[“valid”], loss=loss, evaluator=[evaluator_recall_train, evaluator_recall_valid],)trainer.train()Model training is an iterative process where you may explore dozens of models for different choices of trainable parameters, loss functions, and hyperparameters.However, I highly recommend keeping these experiments as simple as possible. If you find yourself spending too much time tweaking training args to get your model to converge, there’s probably something fundamentally wrong with your data (speaking from experience 😅).Step 5: Evaluate the ModelAs a final step, we can evaluate the model’s Recall@1 score on the testing set. These data were not used for training or hyperparameter tuning, so it gives us an unbiased assessment of the model.evaluator_recall_test = create_recall_evaluator(“test”)print(“Train:”, evaluator_recall_train(model))print(“Valid:”, evaluator_recall_valid(model))print(“Test:”, evaluator_recall_test(model))# >> Train: {‘yt-title-thumbnail-train_Recall@1’: 0.8490566037735849}# >> Valid: {‘yt-title-thumbnail-valid_Recall@1’: 0.9090909090909091}# >> Test: {‘yt-title-thumbnail-test_Recall@1’: 0.75}We see that the model performs well across all three datasets with 75% Recall@1 on the test set. In other words, 75% of the time, the model correctly matches a given thumbnail to its original title. Additionally, the recall for the validation dataset increases by 27%!What’s Next?Multimodal embedding models, like CLIP, unlock countless 0-shot use cases such as image classification and retrieval. Here, we saw how we can fine-tune such a model to adapt it to a specialized domain (i.e. my YouTube titles and thumbnails).Although CLIP is a small model by today’s standards (~500M parameters) and our training dataset was tiny, the final model still demonstrated strong performance on this task. This highlights the power of fine-tuning.If you have any questions or suggestions for future content, let me know in the comments :)More on Multimodal AI 👇Multimodal AI🗞️ Get exclusive access to AI resources and project ideas: https://the-data-entrepreneurs.kit.com/shaw🧑🎓 Learn AI in 6 weeks by building it: https://maven.com/shaw-talebi/ai-builders-bootcamp?promoCode=AI25References[1] arXiv:2103.00020 [cs.CV][2] arXiv:1705.00652 [cs.CL]Fine-tuning Multimodal Embedding Models was originally published in Towards Data Science on Medium, where people are continuing the conversation by highlighting and responding to this story. fine-tuning, transformers, ai, sentence-transformers, machine-learning Towards Data Science – MediumRead More

 Add to favorites
0 Comments